I have a collection of 1:72 scale model aircraft that I have built up over many years. One of these is an Airfix kit I built whilst still at school a very long time ago. The aircraft in question is a biplane built by Hawker in the 1930s and sold to numerous air forces around the world. This particular version is called a Hawker Hart and was operated by the RAF up until the second world war.
Greyscale photograph of Airfix 1:72 scale model Greyscale photograph selected for the drawing
My process started by posing and taking a few photographs of
the model and from that selection chose one to develop a pencil drawing from. I
loaded the photograph into Microsoft PowerPoint and superimposed a grid pattern
over it. Then I saved the resulting image as a jpg file which I could load and
display in my Samsung Tablet.

Greyscale image with drawing grid superimposed
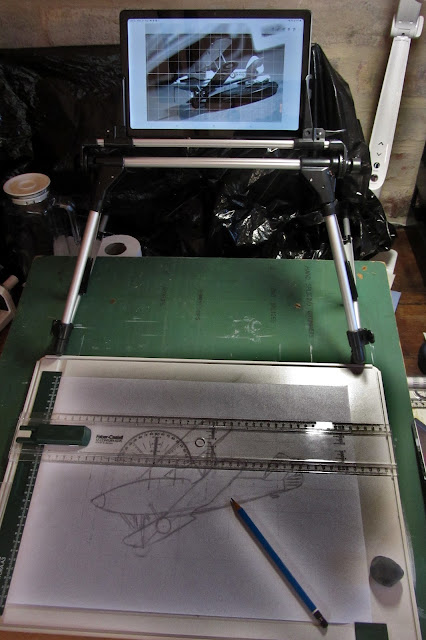
I decided to produce a work on A3 format paper. I loaded a sheet of 60 gsm sketching paper onto a suitable drawing board. In the past to reproduce images using this grid system, I used to draw the grid on the paper first which was a tedious process. With this drawing board I can shift the ruler around and draw or extend lines as needed. I this example each grid line worked out to be 3cm apart to give an image that fitted well in the A3 format.
Set up to copy the photograph onto an A3 paper sheet
I use a variety of drawing instruments including a roller
rule to keep lines parallel with the structure of the centreline of the
aircraft in place, and dividers to ensure that things that are supposed to
converge or get smaller with vanishing points do in fact consistently do this.
The set square is so I can quickly extend or re draw the vertical grid lines on
the paper.
Picture showing some of the drawing instruments used
For most of the process my focus is on structural
elements of the aircraft, I used an H2 pencil and putty rubber, to get the
various lines in place. Curves and circles are the hardest because of the angle
of the aircraft or the particular curves used by the original aircraft
designer. Once that process was complete I worked over the drawing with a high
carbon B2 Staedtler Mars Lumograph pencil to obtain a dark line that would be
visible on a light table or light box.
 |
| Image showing use of high carbon pencils to obtain final line drawing |
I traced the line drawing from the 60 gsm paper onto a sheet of 200gsm Ashrad sketch paper by placing the new paper over the original on a light box. Once I had captured the line drawing, I very gently shaded the background areas of the image. I started shading with a B4 pencil and progressively strengthened it by moving to B5 and then B6. I shaded by holding the pencil by its top end, farthest from the point as possible, with two fingers. Then I shaded by letting the weight of the pencil do the work, I just brushed it back and forth to cover the paper, the pencil as at a very flat angle for this process to work. I did not worry about over-running onto the aircraft image because I could lift these marks out easily with the putty rubber, the lack of weight means there is no indentation to worry about.
Once I had a light grey tone in the background and a horizon line defined, I tilted it a bit to create a bit of dynamic action on top of the diving attitude of the aircraft, I began shading the aircraft itself. As I went along it became apparent that the background needed to be darker to show up some of the highlights on the aircraft, I returned to shading background areas several times as the drawing progressed, and each time used the putty rubber to recover the highlight areas.
To differentiate the sky from the ground I first rubbed graphite flakes into the paper with tissue, and then worked over it with the pencils as described above. By this time I was shading background areas with very soft pencils up to B9.
The aircraft drawing proceeded by starting with a Lyra B4 pencil and re-working the image progressively with softer pencils up to B9. During this process I refined various curves and circles as best I could to arrive at the final image below.


No comments:
Post a Comment